
In this howto I will show, how you can use a privacyIDEA installation to add two factor authentication for many of your servers in your server farm.
The scenario

Imagine you are an ISP or ASP or do some SaaS or any other of these hip TLAs or ETLAs. Anyway – you are running a bunch of servers and you need to take care of your employees or your split personality when authenticating to those dozens or thousands of servers.
You could setup LDAP or Kerberos and use one central password to authenticate on all those machines. But you know, that passwords are weak. So you are willing to add a second factor for strong authentication.
There are several howtos around how you can setup the Google Authenticator with PAM to authenticate to your Linux box. The latest detailed and nicely done I saw here. This is a great way but it is only one! box!
You do not want to put the seed to all of your 100+ machines.
Besides using HOTP or TOTP with the same Token/Seed on several machines raises a security issue. The TOTP value you used to authenticate on machine1 can not be used on machine1 again. Good! But the same TOTP value can be used on a machine2 within the specified timewindow of (usually) 30 seconds.
Bottom line: Managability and security could and should be improved!
Prerequisites
I assume that you have already installed privacyIDEA maybe according to this howto. This howto describes the installation on a CentOS 6.5 system but it can work the same for any other distribution. When you have done so, you have a running privacyIDEA installation with a FreeRADIUS server on top.
User and Token
I keep it simple in the beginning and will only create one token for the user root.
Log in to your privacyIDEA server and create a useridresolver, that points to the local /etc/passwd and a realm accordingly.
Create connection to local passwd
Open privacyIDEA Config -> useridresolvers and create a new Flatfile resolver.
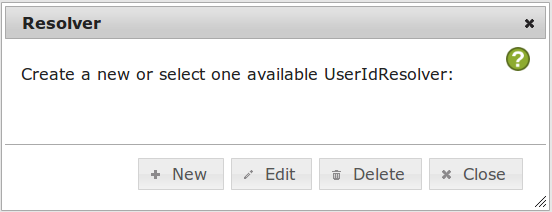
Click the button New to create a new resolver.
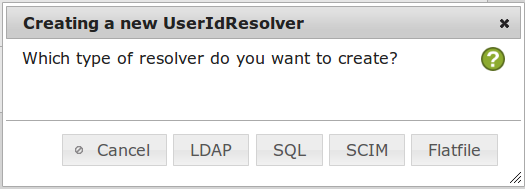
Then you can choose the type of resolver. Click the button Flatfile to create a resolver that connects to the local /etc/passwd or a similar file.

Leave the filename intact and enter a unique name for the resolver like “localusers”.
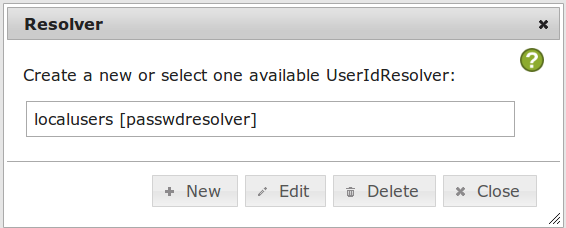
When you save the resolver you will see the newly created resolver in the list of the availble resolvers.
On each dialog window you see a green question mark. Clicking the question mark will take you to an online documentation.
Create a realm
Till now you will not be able to see any users. You need to add the resolver to a realm. When you close the resolver dialog the following notice will appear:

Clicking OK will take you to the realm dialog.
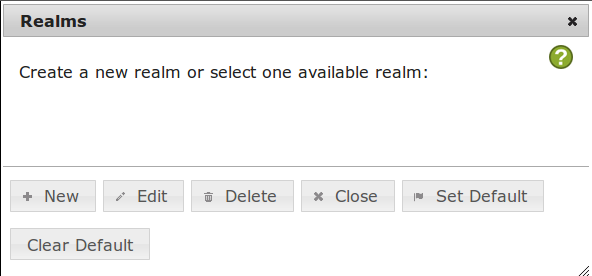
Click the button New to create a new realm.
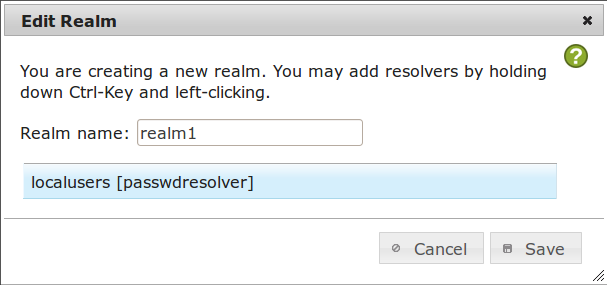
Give the new realm a unique name like “realm1” and select the resolver you just created. The resolver is selected when it is highlighted in blue. Click Save.
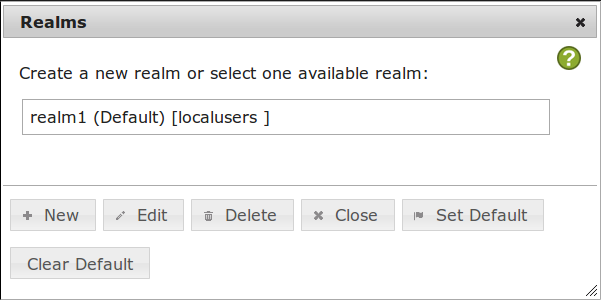
Now you will see that the new realm appears in the realm list. The realm “realm1” is the default realm and the realm “realm1” contains the resolver “localusers”.
You can close this dialog.
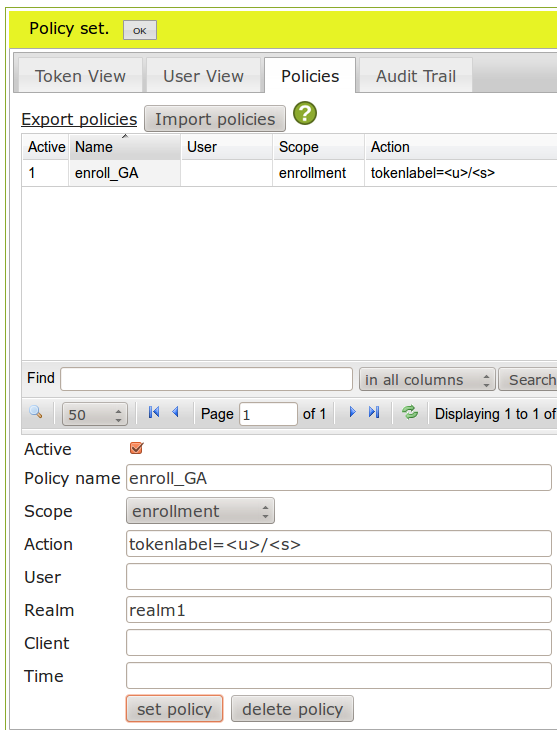
Setting an enrollment policy
When enrolling a Google Authenticator the QR code can contain the label of the token. Usually the label will be the serial number, which is rather cryptic. So we can set a policy that tells the system to add the username to the label. This can be done on the policy tab:
Enroll a Google Authenticator
Please note: If you do not want to use Google Authenticator you can use the FreeOTP app, which is an alternative by RedHat.
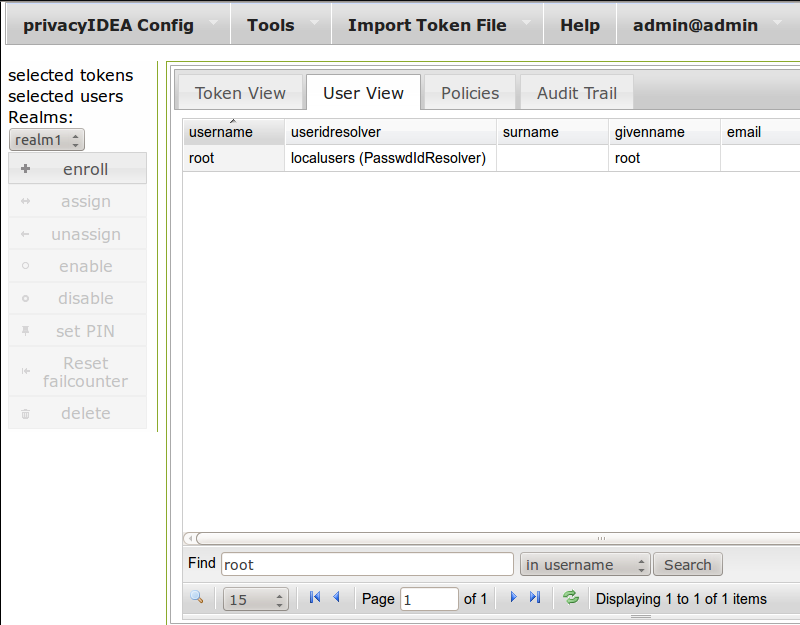
On the tab userview you can now see the users from your /etc/passwd.
These are the users in the /etc/passwd on your privacyIDEA server. The users on your 100+ other machines might be others. But as we will only use the user “root” in this example, the username also exists on the other machines.
You can filter for the username “root”…
Select the user “root” by clicking on it and then click the button enroll on the left side to enroll a token to this selected user.
The enrollment dialog will open:
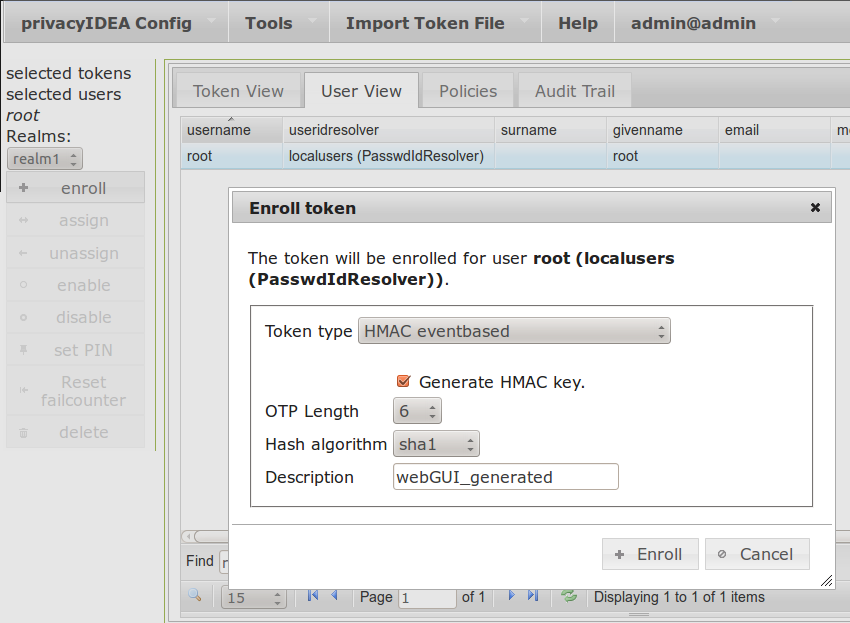
Select the token type HMAC eventbased and check the checkbox Generate HMAC key. This will have the server create the secret OTP key.
Click Enroll.
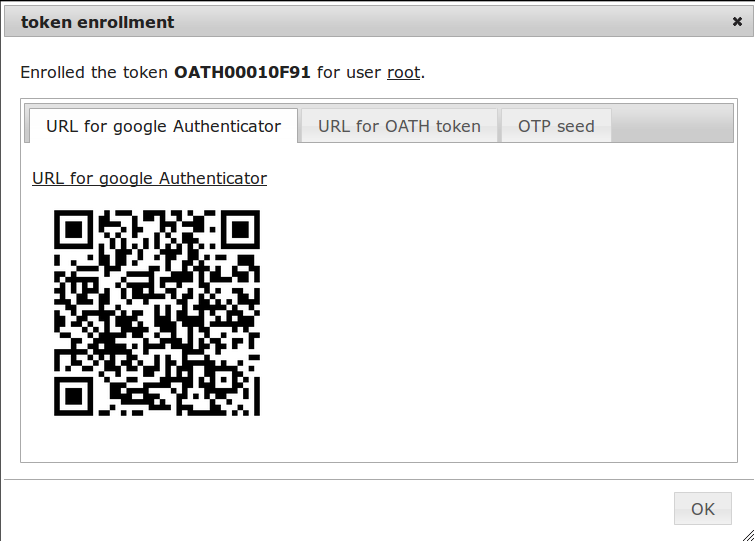
A new dialog shows up, with the serial number of the newly enrolled token OATH00010F91. The token was immediately assigned to the user “root”.
Now you need to scan the QR code with your Google Authenticator App.
If you close the dialog without scanning the QR code you will not be able to retrive the QR code or the otp key again. You will have to delete the token and enroll a new one!
When you close this dialog you are asked for an OTP PIN. You will need this OTP pin in conjunction with the generated OTP value to authenticate.
Testing authentication
The privacyIDEA server comes with an integrated authentication test page. Go to https://your-server/auth/index.
Enter the username “root” and in the password field enter the OTP PIN you set and the OTP value that you generated with your Google Authenticator.
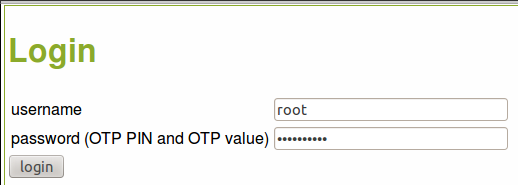
The popup should say that you generated successfully.
Audit
You can view many many audit information on the audit tab. You should see an action “/validate/check”, that says “success=1” and also lists the username “root” and the serial number of the token.
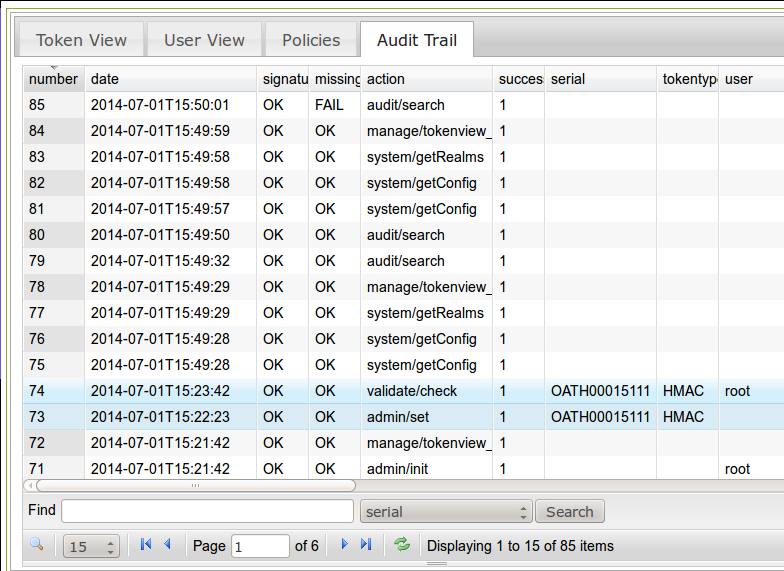
You can use this audit log, if some users fail to authenticate. The fields action_detail and info will provide additional hints.
Connecting your 100+ machines
Configure FreeRADIUS
We already configured FreeRADIUS in the previous howto. But obviously we need to do something with your many many servers.
On the privacyIDEA server we need to adapt the file /etc/raddb/clients.conf. You can either add a client definition for the subnet of all the servers or for each and every client or something in between:
client my-dumb-subnet {
 ipaddr = 172.20.3.0
 netmask = 24
 secret = you_guess_this
}

client my-special-client {
 ipaddr = 172.20.4.123
 netmask = 32
 secret = Zilaika5hoosae1ujio9Oze4
}
After changing the clients.conf you need to restart the FreeRADIUS server.
RADIUS client configuration on the 100+ servers
On your server (which in RADIUS terms are the RADIUS clients) you need to install the PAM RADIUS module. Depending on your distribution this can be pam_radius or libpam-radius-auth.
yum install pam_radius
or
apt-get install libpam-radius-auth
The configuration is located in a file /etc/pam_radius.conf or /etc/pam_radius_auth.conf. There is also some documentaiton in the file itself but basically you will need to set it like this:
your-privacyidea-server you_guess_this 2
The first column being your privacyIDEA server, the second the RADIUS shared secret and the third column the timeout.
If you experience problems with RADIUS authentication you should stop the FreeRADIUS server and run
radiusd -X
or
freeradiusd -X
…which will give you much debug output at stdout.
PAM configuration
Now you need to tell PAM that it should use the RADIUS PAM module.
Each service using PAM has its own configuration file located in the directory /etc/pam.d. So we are looking for /etc/pam.d/sshd.
The PAM configuration knows four facilities: auth, account, password, session. We only need the auth facility, which is responsible for doing the authentication itself.
In the file /etc/pam.d/sshd you will find a line like
auth include password-auth
which is usually used by RedHat and CentOS systems or
@include common-auth
which is usually used by Debian and Ubuntu systems.
In both cases an additional file defining the behaviour in the auth facility is included. We will create our own include file and adapt it.
Warning: Mangling with PAM can result in not being able to login to your system anymore. So take care and be sure to have another way to access your system!
RedHat and CentOS
Change the line in /etc/pam.d/sshd like this:
auth include otp-auth
Now copy your file:
cp /etc/pam.d/password-auth /etc/pam.d/otp-auth
Now you can adapt it like this:
auth        required      pam_env.so
auth        sufficient    pam_radius_auth.so
auth        sufficient    pam_unix.so nullok try_first_pass
auth        requisite     pam_succeed_if.so uid >= 500 quiet
auth        required      pam_deny.so
Now you can enter the OTP PIN + OTP value and the module pam_radius.so will try to authenticate against the privacyIDEA server. If it fails the PAM stack will go to the next entry and use the password to authenticate locally.
If you successfully authenticated with OTP you can remove the third line containing pam_unix.so.
Debian and Ubuntu
Change the line in /etc/pam.d/sshd like this:
@include otp-auth
Now copy the file:
cp /etc/pam.d/common-auth /etc/pam.d/otp-auth
Now you need to adapt the file /etc/pam.d/otp-auth:
auth    [success=3 default=ignore]      pam_radius_auth.so
auth    [success=2 default=ignore]      pam_unix.so nullok_secure try_first_pass
auth    [success=1 default=ignore]      pam_winbind.so krb5_auth krb5_ccache_type=FILE cached_login try_first_pass
# here's the fallback if no module succeeds
auth    requisite                       pam_deny.so
# prime the stack with a positive return value if there isn't one already;
# this avoids us returning an error just because nothing sets a success code
# since the modules above will each just jump around
auth    required                        pam_permit.so
# and here are more per-package modules (the "Additional" block)
auth    optional        pam_ecryptfs.so unwrap
auth    optional                        pam_cap.so
The format is a bit different. The success=3 means to jump over the next three statements (right to pam_permit) if pam_radius_auth succeeds.
In this config you can authenticate with either OTP or with the old local password. If everything works fine you can remove the pam_unix line. But be aware, that you will also have to adapt to success=2!
Client auditing
privcayIDEA can write the requesting client to the audit trail. But for privacyIDEA it looks like the authentication request always comes from the RADIUS server – in this case 127.0.0.1.
Wouldn’t it be nice if we knew on which of your 100+ servers “root” tried to authenticate?
The RADIUS module can pass the RADIUS client IP to privacyIDEA so that the correct IP gets logged.
Go to privacyIDEA Config -> System Config and add “127.0.0.1” to Override Authentication client. This means that localhost is allowed to tell privacyIDEA that another client than itself issued the request.
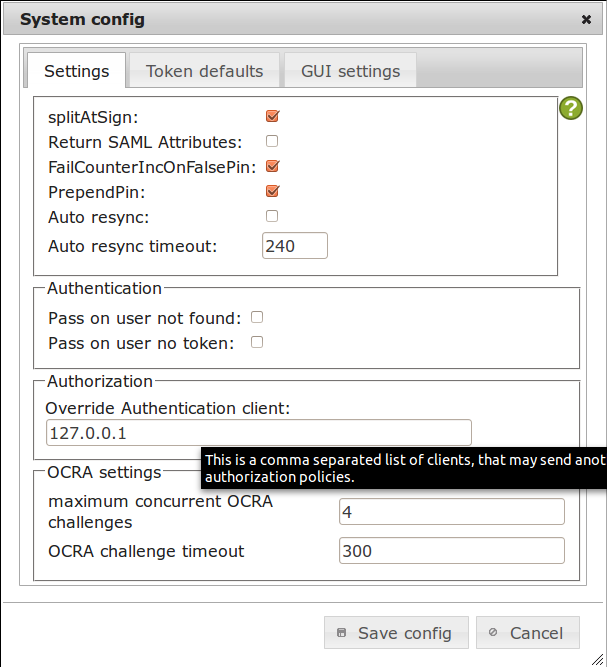
Now you will see the correct IP address in the column client in your audit log.
Conclusion
We created a setup where you have one central instance (the privacycIDEA system) which controls the authentication of all attached servers. Thus you can easily lock the authentication device of a user or enroll additional authentication devices.
For instance if you want to give several human beings root access, you can enroll several tokens for user root. The audit log in privacyIDEA will tell you which token was used to login as user root. Thus you can track which of these many human beings having access to the root account wrecked your database 😉
In a real world scenario you might want to use your users from an LDAP directory.
Note: You can still use SSH with ssh keys.
Questions? Answers!
If you run into any problems drop us a note or you can also ask on the Google group.
We plan to write another howto that will show you how to restrict the login to certain machines to the use of hardware tokens. Thus you can have special machines with sensitive data or a higher security level that can not be accessed with a Google Authenticator but rather with a hardware token like the Yubikey.
Stay tuned!