
privacyIDEA comes with a great feature: The event handling framework.
So learn more about the unlimited power of the event handling framework and how to use its flexibility to get a privacyIDEA setup, which fits your needs.
Event Handling Framework
When speaking of software or products the term “framework” might raise a connotation of “you have to do it yourself”, “things are not ready”, “the software is not usable”.
A javascript framework can help you to develop cool web front ends. A python framework can be the basis for developing microservices and the framework Qt still requires the developer to develop the real program with the business logic.
When speaking of the Event Handling Framework things might similar: We the developer do not know how you want to use privacyIDEA and thus we give you the biggest flexibility. We have not thought of all possibilities in which you – the administrator – could use this framework! So you can come up with usage scenarios or configuration combinations noone has ever seen before!
But when speaking of the Event Handling Framework things are a bit different: You do not have to be a developer to solve your ideas or have privacyIDEA run the way you want it to.
Using the Event Handling Framework you can get the highest flexibility out of a state of the art authentication server, just by easily configuring rules in an easy web interface.
The basic concept of Event Handlers
A top level view
Each API request is an event:
- An authentication request,
- the request to issue a token,
- to block a token
- or unassign a token.
- If a user logs in to the Web UI, this is an API request…
You can see the full list of all API calls here.
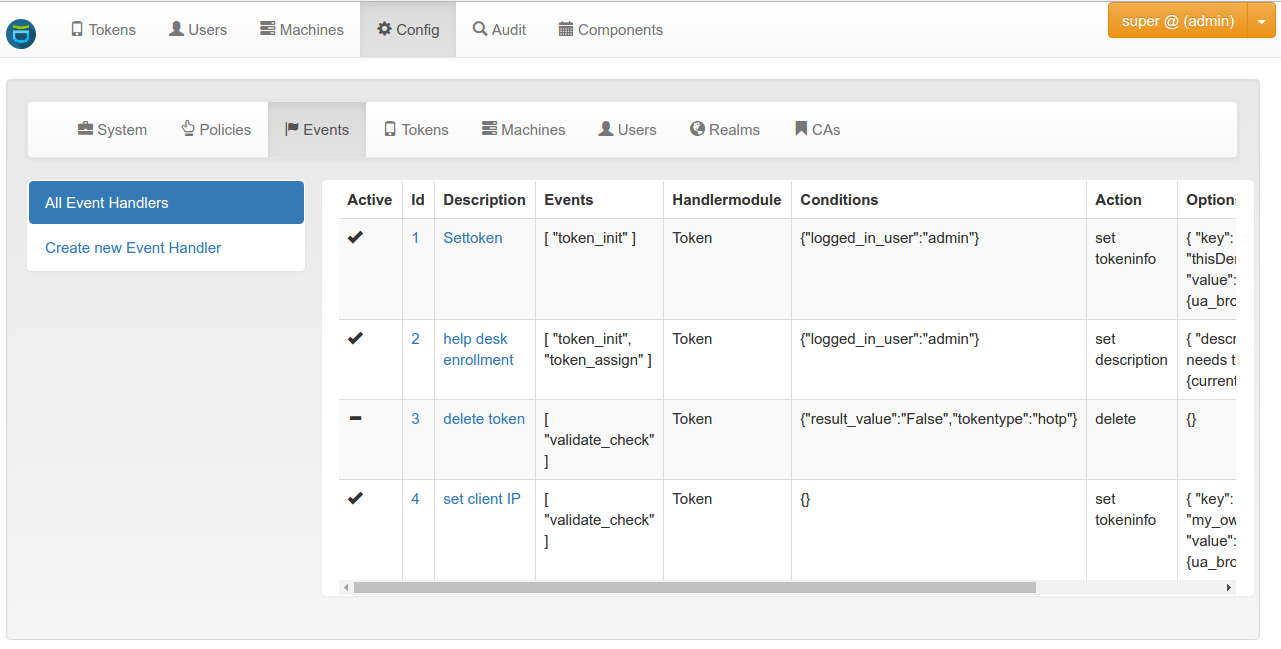
The Event Handling Framework allows the administrator to “attach” new actions to each and every API call/event. It roughly works like this:
event -> condition -> action
Conditions
But these actions are only triggered in case a list of conditions evaluate to true. Conditions can be:
- if an authentication request was successful,
- if the role of the user in the request was “administrator” or “user”,
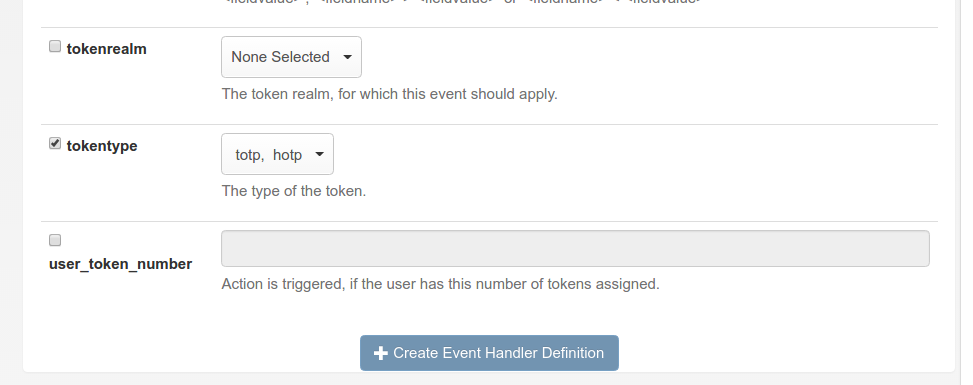
- if the token used was of a certain type
- but also more complex conditions like if a date contained in a tokeninfo field of the used token is before or after a certain timestamp or of a certain age.
There are currently 14 different, sometimes rather complex conditions and the number is growing. For a full list of conditions see the online documentation.
Actions – The Event Handlers
Actions are performed by the event handlers. Currently there are three “groups”: Notifications, Token actions and scripts.
Roughly speaking the Notification actions will automatically notify administrators or users in case of certain events and if certain conditions apply. Notification can be done via email or SMS.
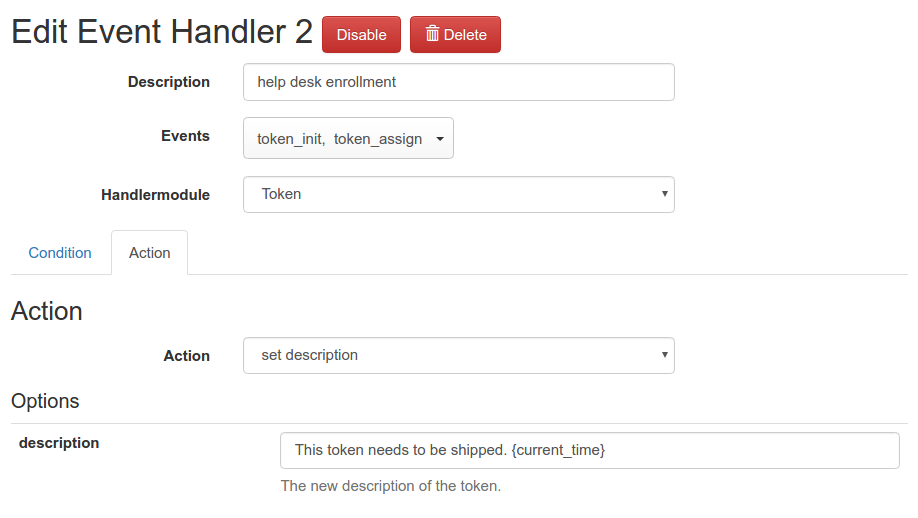
The administrator can also define that Token actions will happen. These are roughly all actions on tokens you can think of: enable, disable, set description and validity period, set abitrary tokeninfo fields, delete tokens and even enroll new tokens! This is probably the most important handler for automating tasks which e.g. can help large organizations with enrollment processes.
Finally there is the Script Handler, which can trigger shell scripts. The privacyIDEA administrator can write and define any number of shell scripts and thus gets unlimited possibilities. The usual use case we think about might be running backups or cleaning up orphaned tokens. But you will have probably a lot of other ideas.
Examples
Some of these examples might occur to you a bit far fetched. But after all these are examples of what is possible. So you may come up with your own scenarios which very probably will also work out nicely.
Notify the user in case his password is breached
The notification event handler can send an email or an SMS to the user, if “he” fails to authenticate. This way the user knows, if someone else tried to authenticate.
This can be combined with the condition of the tokentype. The tokentype is only known (and thus only the event handler will trigger) if the OTP PIN a.k.a. static password of the user is correct. Thus the user gets notified if someone guessed or sniffed his static password but fails at the second factor.
Limit token usage
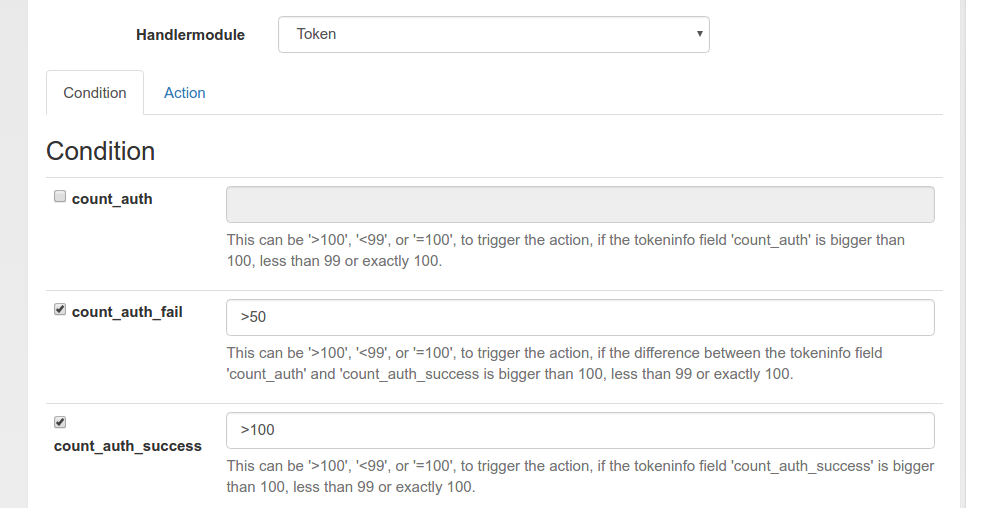
If for any reason you need a token, that the user is only allowed to use for a limited time. E.g. the user would only be allowed to login 100 times.
You can create an event handler definition in the token handler to disable the token, if it either was successfully used more than 100 times or it was unsuccessfully used more than 50 times. (To whoever this may concern).
Automatically Unlock locked tokens
Starting with privacyIDEA 2.20 (currently under development) you can also use timestamp tags in the tokeninfo condition and settings. I.e. if one event occurs, the token event handler can use the “set tokeninfo” to set additional information like tokeninfo key=locked and tokeninfo value={now}. The tag “now” will be converted to the current timestamp. This action could be called on a failed authentication request. You could also mark the token for any other reason.
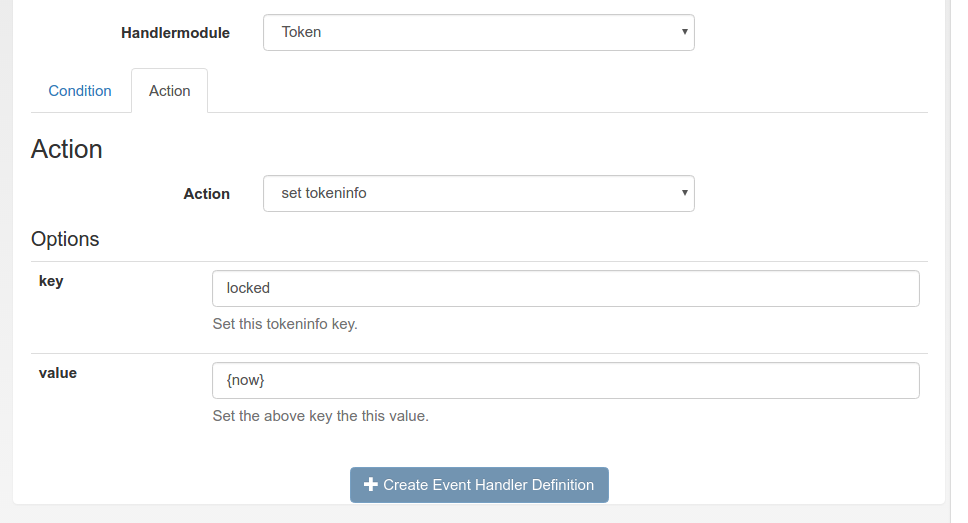
A second event handler can check for this timestamp. I.e. the condition can verify if the timestamp is past – lets say – one week/7 days. In this case a second action like unlocking the token can be performed.

This can be achieved by using the tokeninfo condition. This check can also check strings, integers and dates for being less, equal or greater. This helps to easily automate many tedious tasks.
Under the hood
The online documentation should contain the full developer view of the event handlers.
Decorators
privacyIDEA is based on the python framework Flask and uses a lot of decorators to structure code, reduce lines of code and improve testability. The event handler adds one decorator “@event”. E.g. this decorator decorates the endpoint “/validate/check”.
The decorator takes care of registering this endpoint in the event handler framework but also calling possible actions.
Event Handler Class
Each event handler (Notification, Token Handler, Scripts) is a python Class, that inherits from the Base Handler. Each handler could define its own conditions and its own actions and thus can work self-contained and add any functionality to privacyIDEA.
Do actions
As the event handler like the Token Event Handler use already existing code for diabling or enrolling tokens, these eventhandlers are relatively small and stable. E.g. the token event handler is roughly 100 lines of code defining the allowed actions and another 100 lines of code for calling existing lower level functions.
This is done in the main function “do” of the event handler.
Conditions
Each event handler could also define its own conditions, if this is necessary or makes sense. But for now all conditions are the same for all event handlers and thus only the base event handler class implements the method “check_conditions“.
Finally

Adding event handler definitions is a matter of a few clicks for the administrator. But it is a great step for the automation of your privacyIDEA installation.
Adding a new event handler class is also only a matter of inheriting the base handler class and starting with woughly 50 lines of code. The hardest thing is to come up with a new idea! But the only limit is your imagination!

Start the discussion at community.privacyidea.org